Eczema Free Forever™ Eczema Free Forever™

Zucchine (courgette) Pizza gluten free low lactose

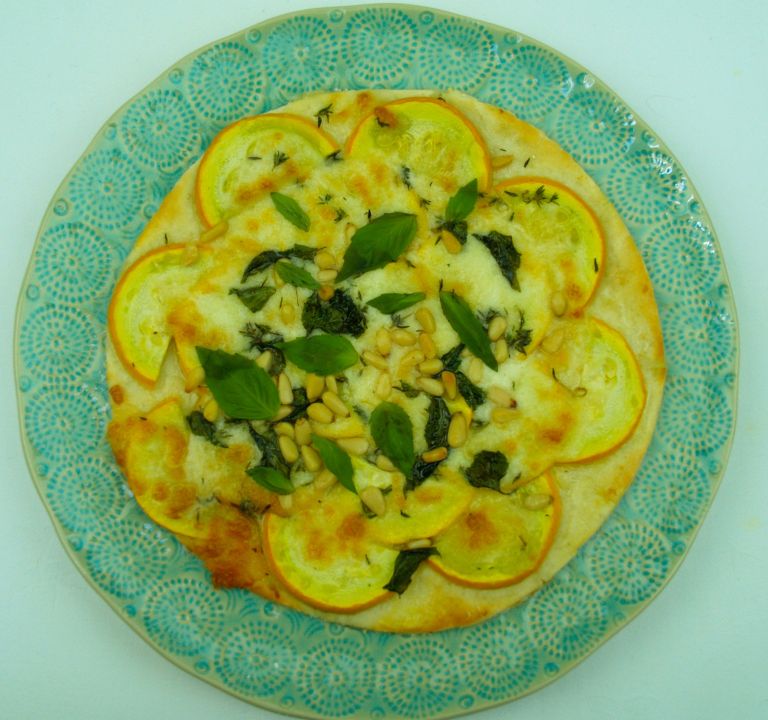
Just the job for using up all those extra glut of courgettes that you have in the garden! Courgettes are great for the low fodmap diet, this recipe used yellow courgettes but green ones will work just as well so don’t feel you need to produce this recipe exactly – although the pizza dough does need to be followed closely and it is a modification of one of Jamie’s gluten free pizza bases, but using lactose free milk and one or two tips from someone who is familiar with using the ingredients and fickleness of cooking gluten/wheat free.

Ingredients

Dough

400g of gluten free bread flour (I used doves Farm with zanthan gum already added)

250ml lactose free semi skimmed milk

2 1/2 teaspoons of castor sugar

7g fast yeast powder

1 teaspoon of zanthan gum

1 teaspoon of salt

1 egg

1 tablespoon of oil

1 teaspoon of gluten free baking powder

Topping

1 sachet of lactose free mozzarella
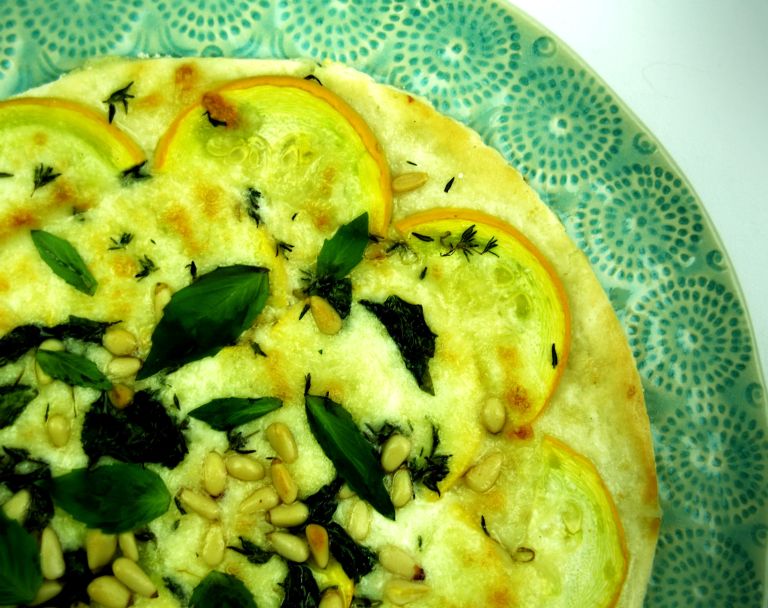
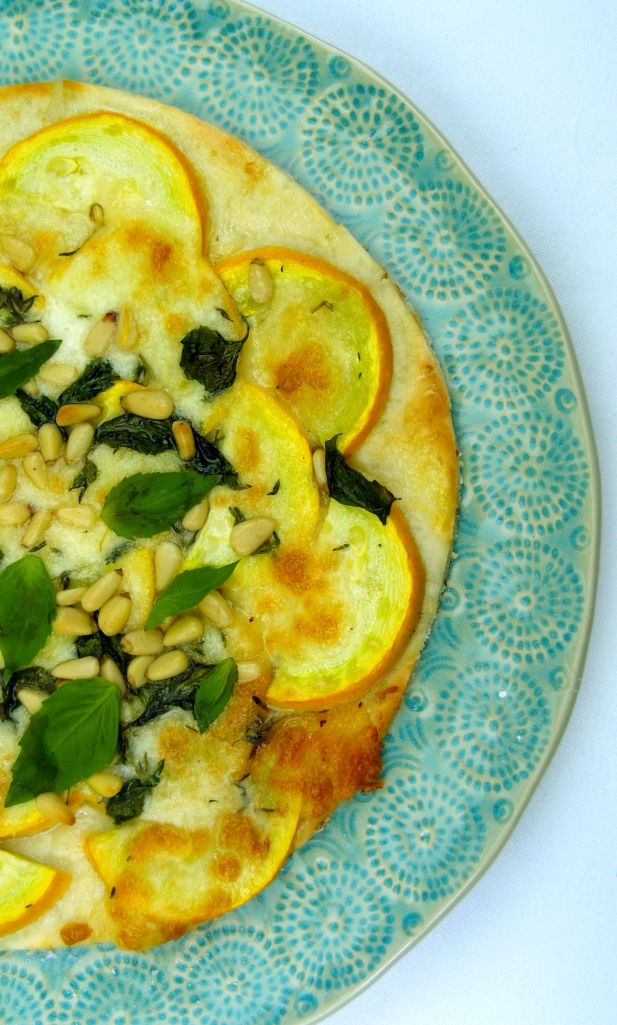
1 courgette

2 small handfuls of pine nuts

a few basil leaves

2 tablespoons of grated parmesan

a few thyme leaves

oil and egg (beaten)

seasoning

Method

Warm the milk to lukewarm

Add 50ml milk to a dish and add the sugar and yeast, mix and leave in a warm area till it bubbles

Weight out the flour, sieve and add the zanthan gum, baking powder and salt – mix well to ensure the gum is fully dispersed in the mix

Add the egg to the rest of the milk, pour in the oil and mix well

Add the milk to the flour and incorporate well, kneed.

Leave for 1 hour in an oiled basin with a cover in a warm place for the dough to rise.

Add two pieces of cling film to your work surface

Add the dough

Roll out as thin as possible if a thin based is wanted (makes around 4 seven inch or one large pizza)

Lift and turn upside down onto a pre-heated pizza stone

Remove the cling film (now on the top of the dough!)

Topping

Add a drizzle of oil to the top of the pizza

Wash and slice the courgette

Remove the lactose free mozzarella from the packaging and tear into thin strips

Dry the mozzarella well with kitchen paper to remove as much moisture as possible – this is very important as any excess will make the base soggy.

Tear the basil and thyme

Grate the parmesan

Combine the ingredients on the pizza base except the pine nuts

brush dough edges that are free of topping with beaten egg.

Cook at gas mark 7-8 at the top of the oven for 10 minutes

Remove and add the pine nuts and cook for a further 5 minutes

Serve and enjoy


talkhealth Blog

Easy Homemade Pizza Dough Recipe

Pizza dough recipe

Something a little different from my usual content but as it’s a new year, there are new things to share and new directions to explore!
After being repeatedly asked for the recipe whenever I’ve made pizza for friends and family I thought I’d do a little post and pop the recipe here so if you want to, you can print it and try it for yourselves.
There are hundreds of pizza dough recipes online and after trying a few of them, this is the one I keep going back to both in terms of its ease and because most importantly, it produces a yummy pizza.
I’ve shared before Ella and Lucy’s love of helping in the kitchen.  Ella especially, learns by doing and by being involved (in this case getting covered in flour and sticky pizza dough hands!).  I feel it is important for both our girls to learn life skills such as cooking and baking even though they are still relatively young.  They both enjoy their food so the end product is always a good motivation for them to help out too.  I’ve also been taking them to a weekly cooking class for the last few months and they both love it.
This pizza dough recipe involves lots of different activities and learning opportunities – measuring, mixing, pouring, kneading and of course eating!  There are lots of different ways of approaching this activity with younger children as it incorporates lots of different skills. Maths, quantities, weighing & counting, hand eye co-ordination and using fine and gross motor skills.  Children can get involved in the dough making process or for younger children (and those of you who like to keep your children and kitchens clean), adding the sauce and toppings may be where they can get more involved.

Ella can now top her own pizza with very little help.  I provide the jar of sauce and a spoon and the cheese and (almost) leave her to it!  We’ve found that although the girls love to adorn their pizzas with lots of toppings, once cooked they take everything off again so I just leave theirs quite plain.

‘I did it mummy!’

Making our own Pizzas has become a weekly activity in our house now and is something we all enjoy doing.   I appreciate it’s very easy to buy a pizza but making your own is a lot more satisfying and really doesn’t take much more time or effort than a ready made one.  Once you’ve mastered the basic recipe, you can be as creative as you like both with the dough and the toppings.

I have got in the habit of keeping a tomato based pizza sauce in the cupboard and some grated mozarella/pizza cheese in the fridge.  There are only 4 ingredients in the dough recipe itself which most people will already have in their store cupboards.  This is also a versatile recipe – you can make the dough ahead of time or to use straight away.

Ingredients – quantities provided make x2 10 inch (thin crust) pizzas

10 oz Plain Flour (’00’ grade if you can get it but regular plain is fine)
6 fl oz warm water
1 tsp fast acting dried yeast
1 tsp salt

Method

1. Weigh out your flour and put it into a large mixing bowl along with the salt
2. In a measuring jug measure out the water (should be warm but not hot or you’ll kill the yeast – I use water from a recently boiled kettle and dilute until warm)
3. Add the yeast to the water in the jug and stir until dissolved


4. Add the water/yeast mixture to your bowl with the flour and salt in it
5. Mix using a fork or your hands until the mixture has come together. Don’t worry about making one clump of dough at this point, it wont properly come together until you start to knead it.  I find it is much easier to tip the roughly mixed contents of the bowl out onto the worktop and begin to knead it to bring it all together
6. Knead for 5 mins, or until the dough is smooth and elastic then shape into a ball
(you can skip step 7 & 8 if you’re in a hurry…)

7. Using a small amount of olive oil, grease a mixing bowl and place the dough into the bowl. Cover with cling film and leave somewhere warm/room temp to rise
8. Leave to rise for at least an hour
9. Then roll out your dough as thin as you like and place on a floured or oiled baking tray.   Top with whatever your favourite toppings are.  Alternatively knock the air out of the dough, loosely wrap in cling film (it will continue to expand) and keep in the fridge for up to 3 days if you want to save some for later.
10. Bake for approx 10mins at 200C (180C fan)

Enjoy!

talkhealth Blog